Adding Metadata
To add metadata to most fields, simply double-click on the boxes beside the field names and enter information. If you routinely type the same information in the same field, check for pull-down menu of past values. Many of the fields, such as City, State, Country and Keywords, have this feature.
For details on what information belongs in each field, see the Guide to Photometadata Fields or download the IPTC User's guide.
If you intend to fill in most fields, do not press the enter or return key after typing an entry. To go to the next field, press the tab key after entering your information. Holding down the shift key and pressing tab, will take you to the previous field.
Once you have several values in the pull-down menus, a choice of possible entries appears as you type the first letter in a field. Using the the tab key to advance, you may find you can enter a lot of information without ever lifting your fingers from the keyboard. (Note: If you do press the enter or return key and then press tab, you will cycle from the main Info Panel, to the Description field, to selected images, then to the Search box before returning to the Info panel. We suggest you just use the tab key.)
Also note there are a few fields, such as Keywords and Categories, that can hold more than a single entry. Pressing the tab key after typing in these fields will create an additional entry for that field, rather than taking you to the next field. You will need to move and click with your mouse to the next field. There are a few commercially available keyword sets such as the Controlled Vocabulary Keyword Catalog, though you can also search on "Expression Media Keyword Catalog" for other options.
To save to the Expression Media database your changes to the data fields, you can either click on the check mark button in the upper right corner of the Info panel or click on another, unselected image.
If you make a mistake, you can remove entries by selecting them and pressing the delete key. A line will appear through the entry, and the green slash beside the field will light up. When you press the green check mark or click to another image, that field will clear. At some point you will probably want to get this information back into the original file, so note that for now, the information is only in the Expression Media database.
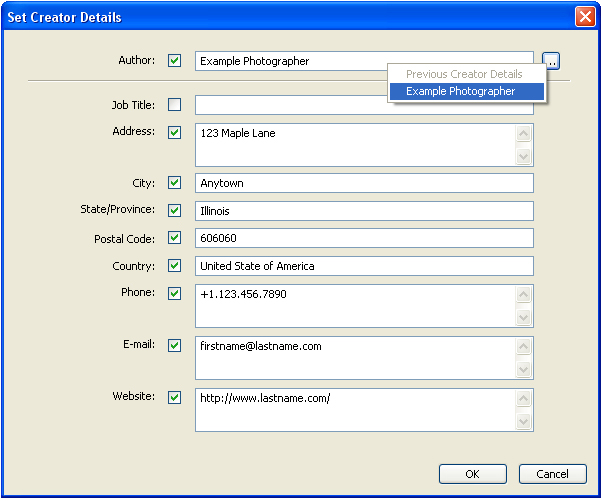
Access the Contact Info fields with the tiny icon to the right of the Creator field (if using the IPTC Core fields). If you have the Adobe Photoshop CS or Expression Media field names in use, look for this next to the Author field instead. Clicking this icon will reveal a new dialogue in which you can input your address, phone, email and Web site information.
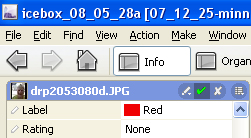
You can rate your images using stars or give them a color label. The star ratings are stored in XMP, and will show up in Adobe Bridge, Lightroom, Photo Mechanic and other applications that use XMP. The color labels in Expression Media, however, are stored using a unique method and are not widely compatible, so if you want your ratings to appear in other applications, you may want to stick with the stars.
Again, please understand all of these entries, whether text values or star ratings, are only stored in your Expression Media or iView MediaPro catalog at this point in your workflow. In order to embed the edited metadata in your image file, so it can be viewed outside your catalog, you must "synchronize" the information to the original file.
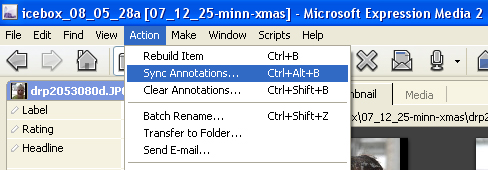
Choose Sync Annotations from the Action menu, and select Export annotations to original files from the resulting dialogue. You can also use the keyboard shortcut Ctrl+Alt+B (Windows) or Option+Command+B (Mac) to access that dialogue.
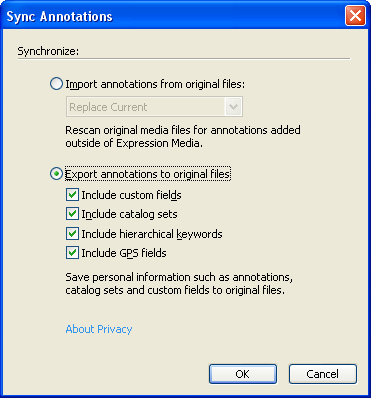
You can choose from several options when synchronizing. You can include GPS information, hierarchical keywords, catalog sets and any custom fields you have created. Leaving all these export options checked will ensure all such information is stored in the original image file. If that information is not present in the database, nothing will be added, so it does no harm to leave them checked.
If you have modified image metadata with other software tools, you can use Sync Annotations to update information in the Expression Media database by pulling it from the modified files. Import options allow you to replace the existing information or merge it, with a choice of whether the information already in the file - or that previously entered in the Expression Media database - takes precedence.
Of course, the image file format must also support synchronizing of metadata for this feature to work. Expression Media writes both IPTC-IIM (using the Image Resource Block) and IPTC Core (using XMP) directly into JPEG, JPEG2000, TIFF, Photoshop (PSD) and DNG files. It can also write legacy IPTC-IIM metadata to Nikon NEF and Canon CR2 Raw files. Second, the file must be in a location where you can write or resave the file. If, for instance, you cataloged a CD or DVD, you will not be able to synchronize the metadata added to the Expression Media database with the original file, since it's on "read-only" media.