Verifying Metadata Entry
Photo mechanic makes it easy to enter metadata, but sometimes it can be hard to know whether you have already entered the metadata for a particular image - especially if you applied some metadata on Ingest. If you have just brought in a set of images from your camera, it is safe to assume they contain no descriptive metadata. However, if this is a folder of images you worked on previously and are not sure whether you finished, may not be obvious which images were annotated – at least not without opening the IPTC Info panel for each image. Fortunately, there is more than one way to view the descriptive metadata for each image file in Photo Mechanic.
The most obvious method is the one mentioned earlier, when in the contact sheet view (the one with lots of thumbnails showing). Just hover your cursor over the file you want to check and select the "i" pop-up box in the lower-left corner of the file thumbnail. This will open the IPTC Info dialogue for that image. Alternatively, you can select an image and press "i" on your keyboard. If you have already double-clicked on the image so it is open in the viewer, you can still use the "i" keyboard shortcut, or click on the fifth icon from the left in the Preview window's tool bar, which looks like the letter “I” in a circle. Once that dialog opens, you can quickly move to the data for the next image by clicking on the Next arrow navigation button under the thumbnail image in the dialogue.
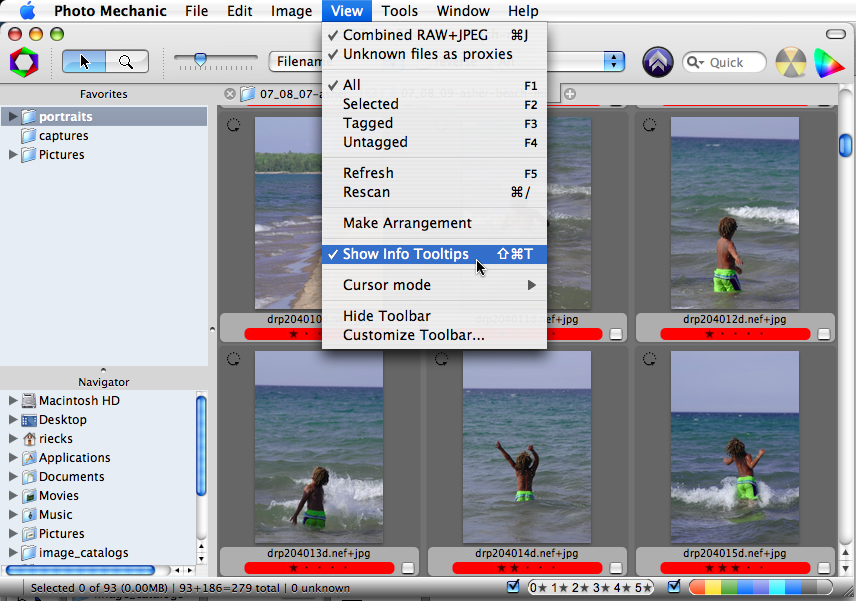
A much quicker way, especially if you want to immediately see whether your images already contain metadata – and not have to press any keys or choose from menu items – is to use the Info Tooltips option located under the View menu. Make sure the check is showing next to the Show Info Tooltips item in that menu, and when you move your cursor over an image, a black box will appear beside it, showing you a preset list of values.
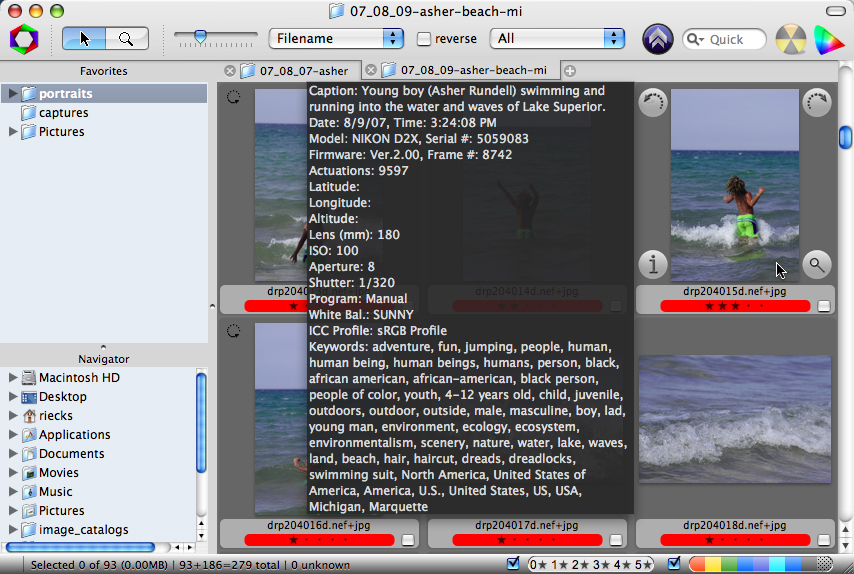
The default setting for the Info Tooltips primarily shows Exif data. You can see this same info if you Conrtol-click (Mac) or right-click and choose “Image Info” – but activating the Info Tooltips does the same with less effort.
You can easily configure Photo Mechanic to show a different set of metadata fields. Under the Edit menu locate the Settings submenu and select the Set Info Text... option. This will open a new dialogue where you can tell Photo Mechanic which fields to display. The presets, which mostly show Exif info, appear by default; however you can remove these entirely or leave them if you wish.
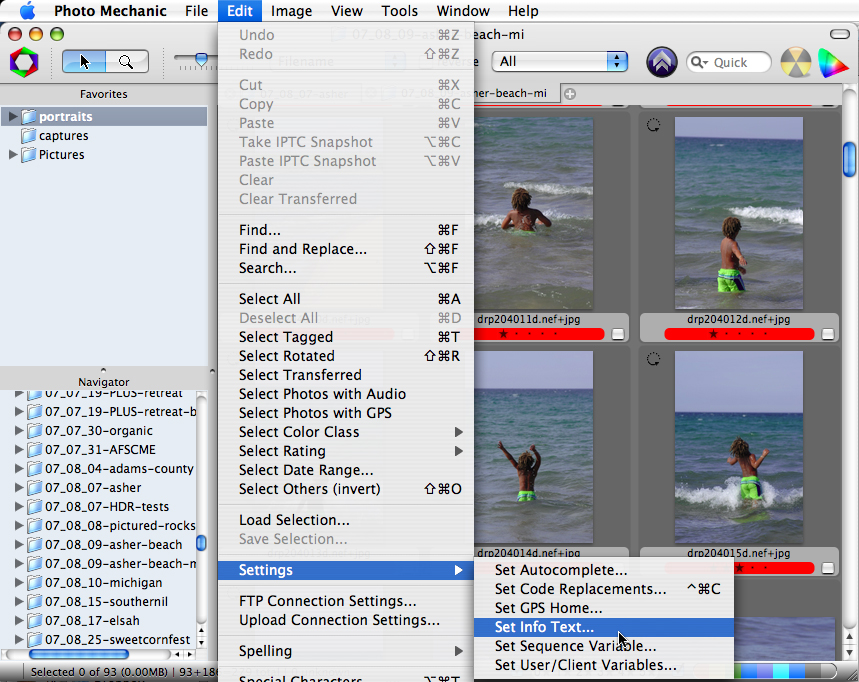
There are many options besides showing just the Exif or other standard IPTC fields. Within the Set Info TooltipsVariables… button to bring up the entire set. It includes GPS, ICC and many other data types. Near the end of this very long list, you will find a set of IPTC variables. If you choose Caption, Capt, {caption} will appear in the field where the cursor was last located. If you type Caption: it will read Caption: {caption} when you mouse over with the Show Info Tooltips option turned on. dialogue, click on the
To add the Keywords data, put Keywords: {keywords} on a line below the caption, and you can quickly see whether an image includes these annotations without lifting a finger or pressing a key.
If you only want those two fields, the contents of the Set Info Tooltips dialogue would look like the following:
Caption: {caption}
Keywords: {keywords}
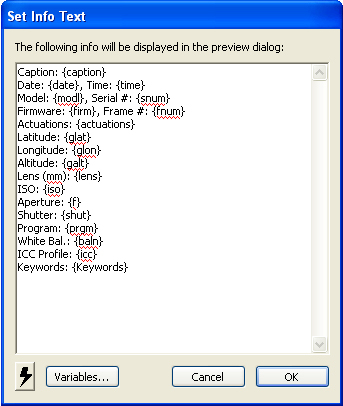
If you wanted to know whether an image file includes GPS information, along with the camera’s aperture, shutter and ISO settings, you might construct a list like:
Caption: {caption}
Date: {date}, Time: {time}
Model: {modl}, Serial #: {snum}
Firmware: {firm}, Frame #: {fnum}
Actuations: {actuations}
Latitude: {glat}
Longitude: {glon}
Altitude: {galt}
Lens (mm): {lens}
ISO: {iso}
Aperture: {f}
Shutter: {shut}
Program: {prgm}
White Bal.: {baln}
ICC Profile: {icc}
Keywords: {Keywords}
If you want to use the set above, simply cut and paste these values from above directly into your Set Info Text dialogue.
You can also use some of these same variables to modify the Thumbnail labels that appear below each thumbnail. Those settings are inside the Preferences dialogue. Go to the Contact Sheet tab, and under the tab’s ThumbnailsLabel field to change Name Only to Name + 1 label (or two or three if you want more). The field marked Label 1: directly below that will no longer be grayed out, and you can input {caption}, or {keywords}. From that point forward, you will see this information below the filename, under the thumbnail – as soon as you add a caption or keyword to an image.